AustralianLight - Landscape Photography AustralianLight - Landscape Photography

AustralianLight - Landscape Photography is my new site with my good mate Bernie. If you have found my blog posts useful over the years, then how about giving us a hand to promote AustralianLight.

We are doing everything we can to get our australian landscape photography out there and guess what..... it's bloody hard work!! So please visit the gallery and if you like what see, share it with your friends.

Thanks, we really do appreciate your help. - Russell

Thursday, 29 November 2007

Focus Confirm Adapters v's Split Screen Focusing

As you may have read in this blog, I like to use some manual focus Olympus OM lenses on my 1Ds2 and this of course, is done by way of an adapter that converts the Olympus mount to a Canon lens mount. This is such a simple process of "click on-click off", that I also carry mounts for M42 Screw and Nikon lenses.

Using other manufacturer's lenses opens up a whole new world of imaging, with access to specialty glass and their unique qualities.

The downside is of course that AF (auto focus) does not work and that the lens' f-stop needs to be shut down manually.... but for most of my images (landscape) this is not a drama, as there is plenty of time to get setup and to get things right.

For those times that are a bit more hurried though, I find the lack of AF a bit of a pain. Yes in the old days that's how everyone did it (inc. me)... but those days are long gone and without regular practice, accurate manual focusing is a skill that can quickly be lost.

Also, today's AF cameras are not really designed for manual focusing and the necessary aids have generally gone missing from the view finder and in their place are focus confirm lights and beeps. So this leaves all the hard work up to the automated system that delivers us a pretty light or beep, so we can feel good about the clever bit of electronics that we have in our hands.

So now that we place an old school manual lens in front of all this high tech, our cams all of a sudden are not so clever after all and we find the standard focusing screen hopelessly inadequate for us to judge focus and the silence of our friendly beeps deafening.

If you are lucky enough to have a camera with interchangeable focusing screens, it's a simple matter of popping out the standard screen and dropping in a new "designed for manual focus" split-screen. This screen's center circle has be divided in two and it is a simple matter of lining of the two halves on the subject that you want in focus.

This a very accurate system and one that has been used for years. It does have it's drawbacks though.... It's not fast unless you practice and it can, at times, interfere with the camera's exposure readings, especially in low light as one of the halves has a tendency to go black.

With this in mind, some clever Dick has come up with an adapter that not only converts the lens mount, but it also carries the AF circuitry that would normally be found on the regular AF lens. This tricks the camera into thinking that there is an AF lens attached and like magic, the flashing lights and beeps of the AF confirm come back to life.

This sounds like the ticket yes? Well.... "for me" this system has a bit of a problem. As you focus the lens there is no real visual stimulus that you are approaching correct focus.

Sure the entire focus screen is getting sharper, but as I said earlier, the screens are not really designed for this these days and the visual help is minimal at best. Unlike the split screen where you can clearly see the two halves approaching "line up".

So with the AF confirm adapter it's more of a "lights on - BEEP your there!!" and you need to put the brakes on REAL quickly! If your not quick enough, you have actually passed correct focus and need to back up a little.

But just how far do you back up? I have found that the AF light will actually stay on for prob a degree (or perhaps 2) of the turning of the focus ring. So without the visual stimulus of the "exact moment of focus" like the split screen gives you, it can be very hard indeed to obtain a truly accurate focus.

Now this will not be an issue with broader scenes that you are covering with heaps of DOF, but in a situation such as macro or shallow DOF portraiture where absolute accuracy is required, the focus confirm adapter becomes very difficult to use in my opinion.

So perhaps the best thing to do is to become VERY familiar with the quirks of each system and use whichever one is going to suit the photography that you are doing at the time. ...either that, or stick with AF lenses, as those suckers have really good brakes! ;-)

Also see: http://russellspixelpix.blogspot.com/2007/06/olympus-lenses-on-your-canon-slr-one-of.html

Cheers

Russell
Australian Digital Photo Of The Day: http://www.potd.com.au


Quality Fotodiox lens adapters for various camera/lens brand combinations are available from Amazon, as are camera focus screens more suited to alternate lenses...


Tags: lens adapter lenses nikon pentax canon sony dslr body slr focus confirm af chip auto focus alternate lenses


Zenitar 16mm Fisheye - Test on 1Ds2


I was lucky enough to pick up a second hand MC Zenitar 16mm Fisheye lens recently. I have heard a lot about the Zenitar and how good it was for the price and at only 150AUD I figured it would be worth the giggle.


Well I am happy to say that this lens has blown me away with it's performance!

I am very impressed with the sharpness, contrast and colour rendition that this lens provides. At f11 even the corners are very good, with softness only just creeping in right at the very corner's edge.

Lens flare is a bit of an issue, but I don't think it's a deal breaker, considering that even if purchased new, these are a very cheap lens (eBay AU$250'ish delivered via HK).... plus, the flare produced could easily be repaired in Photoshop. (see highrise building sample image)


An important thing to remember is that I would only recommend this lens for full frame cameras such as the 1Ds/5D/D3 series cameras (or 35mm film cams), as the smaller imaging area with APS-C sensor cams (400D/40D/D70/D200 etc) would see much of the curvy outer fish effect cropped.

Having said that, if the fish effect is not important to you, then this lens could be used (with care) quite effectively as a budget wide angle solution for APS-C.

If you want to see just how good the corner/edge performance is, a larger (about 700k) strip at 100% image size is available from the link below...
http://www.potd.com.au/samples/GCConventionC_CornerSTRIP.jpg


Cheers

Russell
My Gallery: http://www.pixelpix.com.au/gallery
Australian Digital Photo Of The Day: http://www.potd.com.au


Photography help for beginners - Film & Digital Camera Techniques - Post Processing - Photography tips and tricks - MC Zenitar 16mm Fisheye


Wednesday, 18 July 2007

Reader's Technique #1: Split Toning - David Haviland

This technique has been submitted by David Haviland http://havilandphotography.blogspot.com

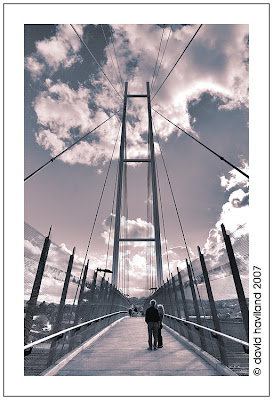
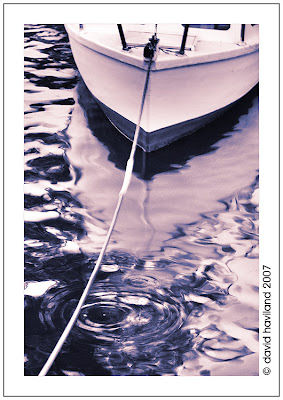
Today I thought I would give a tutorial in a processing method I use fairly often. This technique is a split toning. A basic description of this would be a duotone image with 1 colour being used for the darker tones only and another tone for the lighter tones only.
(Note this image is for sale here: http://www.redbubble.com/works/show/19612)


(Note this image is for sale here: http://www.redbubble.com/works/show/19582)

So how do I get this effect, quite simple really if you have even a rudimentary knowledge of photoshop, and I can assure you a rudimentary knowledge is all I have.

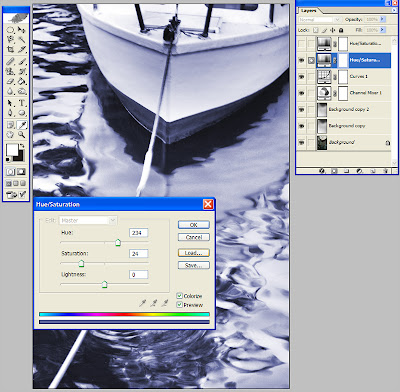
To begin with I transform my image into a black and white image with the tones/contrast that I want. Next I create a hue saturation layer, the 2 colours I believe work best are blue and red as in the mid tones where they blend they form a nice purple colour.

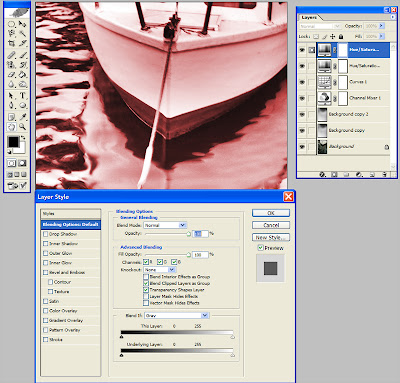
This next image shows the result after the first hue saturation layer has been applied. You have to make sure the colourize box is checked and then just pick a colour and saturation that you think suits, as this is done as an adjustment layer you don't have to worry too much about getting the precise colour yet as you can come back and make adjustments later


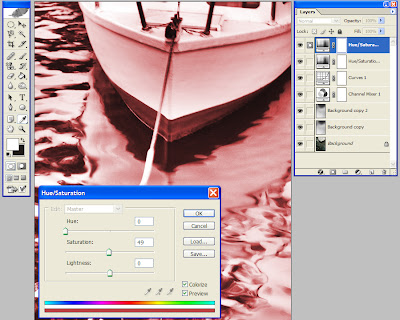
Next you create your second hue/saturation layer above the previous one with the second colour you want.


Now this is when the magic happens, by double clicking on the blue section next to the title hue/saturation in the layers palette, you will bring up the layers style box, make sure you do this on the top layer of the two.


Down the bottom of the box you will notice to 2 gradient bars, these bars are used to determine how much of the current layer is blended. The top bar is used for keeping, rejecting tones in the current layer, the bottom layer is used for keeping/rejecting tones based on the tones in the layer below, for this procedure I use the bottom one.

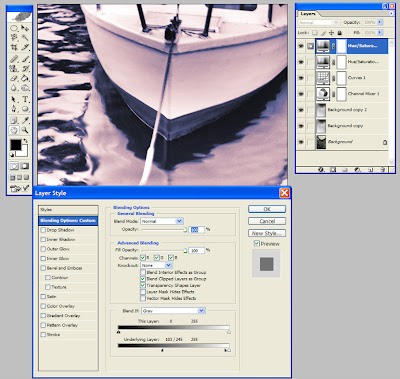
You will notice markers at either end, these slide inwards, by sliding the black one to the right you are saying do not show anything on the current layer that is darker then the point it's at. It is hard to see but if you look carefully you will see that there is a line down the middle of the slider, this is because the slider can be split into two.

You may be asking why we would want to do that, by splitting the slider in two and moving the right hand side (in the case of the darker slider) towards the right we make the blend between the two tones a lot smoother and gives a blend between the two layers, in the case of red and blue it forms some nice purple shades. Anyway here is a shot showing the adjustment in this image.

Next is just fine tuning until you have the image the way you want. I hope you have found this interesting and informative and if you have any questions about this technique please contact me via my blog as linked above.

-------------------------------------------------------------

Many thanks David for your submission.

Cheers

Russell
My Gallery: http://www.pixelpix.com.au/gallery
Australian Digital Photo Of The Day:
http://www.potd.com.au


Photography help for beginners - Film & Digital Camera Techniques - Post Processing - Photography tips and tricks - Split Toning


Wednesday, 4 July 2007

Image Showcase #1:

I thought that it might be a good idea to share some images and talk a little about them....

So for my very first "Image Showcase" I would like to present....

"Fire Fighter"

This image is one of my faves, because it is much, MUCH more dramatic than what was really going on at the time.

The fire was a small.... "very" small, grass fire down the road from my place here in the Gold Coast Hinterland. I noticed the smoke from my home and thought that it may offer some photo ops.

When I arrived the Rural Fire Brigade boys were already on scene after travelling a long and tiresome 10 meters from their station. Yep! 10 meters! This fire was in the paddock right next door. ;-)

Fuelling the flames was grass and since it was located in a horse paddock, there were no additional fuel sources.... so this fire was always going to be short lived and unspectacular.

Pretty much it was "all over red rover" and by this stage the fire fighter pictured was not battling flames, but just wetting down already burnt areas where small pockets of grass & ash were still glowing.

So with not much excitement, my shot was going to rely on interesting lighting, as the fire fighter was backlit by soft, warm, smoke diffused light. While the background of unburned dry grass, was lit by a patch of direct light that had found it's way through the smoke.

After shooting a couple of frames, I noticed that one of the only remaining clumps of grass (that was quite high thanks to it being located around a fence post) was about to catch fire. To capture these flames I needed only to take a couple of steps to the left, so my overall composition was not effected much at all.

Fearing that my auto-focus may be drawn to the flames rather than stay with the fire fighter (who was some 10-15 meters behind the flames), I switched to manual and managed only a couple of frames before the fuel was exhausted and the flames vanished.

I was shooting from some distance (using 200mm), but the heat generated by the flames was quite astounding and it was this heat that created the distortion effect that you see in this image. There have been no post process enhancements or Photoshop techniques applied to this image at all.

This heat effect is commonly seen while driving on a hot summer's day, as the heat generated from the sunburnt road will often make the distant horizon shimmer and distort.... sometimes the road even looks wet up ahead.

This distortion is simply the light refracting through the heated air, while the wet effect is created when the light from above is reflected back towards you, just as if the super heated air above the road was a mirror.

The following image is a good example of both distortion and reflection created by heat....


It can be real fun to play with this natural effect, so if you have access to a commercial runway or a safe highway location you may want to give this a go. ;-)

BTW... Long tele lenses make the most of this effect, as getting close to this is like chasing a rainbow, it just can't be done.


Cheers

Russell
My Gallery: http://www.pixelpix.com.au/gallery
Australian Digital Photo Of The Day:
http://www.potd.com.au


Photography help for beginners - Film & Digital Camera Techniques - Post Processing - Photography tips and tricks - Heat Haze Image Showcase


Saturday, 23 June 2007

Tip 8: Olympus Lenses on your Canon SLR


One of the wonderful things about the design of the Canon SLR (both digital and film), is that it is well suited to the use of non-canon lenses via an adapter.

This is possible because of the shorter “flange-2-sensor” distance (eg the distance between the lens mount and the film/sensor) used by Canon. This shorter distance means that lenses from other manufacturers want to sit further out from the lens mount and this allows space for the use of an adapter plate.

I will use Olympus as an example here because that’s my main “alternate” lens of choice. Canon’s flange-2-sensor distance is 44mm, while Olympus’ OM (that’s their Old 35mm film camera/lens range) is 46mm. So the Olympus OM lens needs to sit 2mm further forward from the Canon SLR’s lens mount.

Quite simply then, the Olympus OM-2-Canon EF adapter needs to be “EXACTLY” 2mm thick. I say exactly because if it’s not right, it will effect the lens’ ability to focus at infinity. Other focus distances won't be effected, because adapter thickness variations are easily compensated for in the focusing of the lens itself. But the all important ability to focus at infinity, is good reason to be picky when choosing an adapter.

Another reason why the Canon EF lens mount is suited to the use of other manufacturer's lenses, is that it is “big bore”. Put simply, EF lenses are fatter than most and like the shorter flange distance, this allows room for an adapter.

Here you can see the HUGE rear element of the Olympus 50/1.2, fitting snugly inside the Canon sized lens mount. Note the pin extending in from the right of the adapter. This pin contacts the aperture mechanism of the lens and forces the lens to "stop down" as the aperture ring is turned.

Adapters are available for a wide range of alternate lenses, but I personally use Olympus, Nikon and M42 lenses on my Canon DSLR. As I stated earlier though, my alternate lens of choice is Olympus OM and I tend to use the other mounts only when photographing with friends and borrowing their lenses.

Why Olympus Lenses?

Because they ROCK! Many Olympus OM lenses have long enjoyed a reputation of being high quality, great resolvers of detail, compact, reasonably priced and lacking of (or at least well controlling) optical defects such as chromatic aberration and distortion.

Naturally there are some dogs in among the OM lens line up, but name me a manufacturer who doesn’t have the odd dud design….. and don’t say Zeiss, even they have a few!

My first venture into OlyOnEOS was with the Olympus 21mm/f3.5. This lens is one that had received rave reviews for quite some time, but sadly, after 3 versions I was yet to find a good one... soft corners and chromatic aberation were a very real problem. The f2 version of this lens commands big $$$ and perhaps it is better than the f3.5, but my experience with the f3.5 put me off taking the dollar risk and purchasing an f2.

So presently my Olympus lens line up includes a 24mm, 28mm, 35mm and a 50mm/1.2. The later being one of my faves, as the 1.2 aperture allows minimal DOF images at a regular field of view.

As you can see in this headstone image, the DOF from the 50/1.2 is shallow and maintains focus only on the flowers, while the background quickly becomes soft.

It should be noted that these flowers are actually sitting right beside/on the headstone.... there is no space helping with the background separation. An image like this would not be possible with a standard 50mm, as it's smaller aperture would always maintain some background focus.
The 24mm is an amazing sharp lens that resolves incredible detail…. This I use mainly for panoramas, as the 24mm field of view (in the vertical orientation) and minimal curvilinear distortion (if any) produced by this lens is perfect for stitched landscapes.

This billabong image is the result of 15 vertical images, stitched to form one 140Mb file that is almost 3 feet wide... and that is "before" any interpolation to increase size. This image could easily be interpolated to 6 feet wide or more, while still maintaining extremely good quality.... this is why lens resolution or "resolving power" is so important.
This image will give you some idea of the resolving power of the Olympus 24mm.

It has been cropped out of the above Billabong panorama and is presented here at 100% of it's original size. By that, I mean that if you were viewing this image on the wall, this tiny portion of the image would be the size as seen here.


The 28mm and 35mm are equally impressive as the 24mm in all respects and get a run when the longer focal lengths are required, but I will admit that it’s normally the 24mm that I grab for this type of image.


I have owned longer focal lengths too and like my lenses listed above, they were very good performers. I did not keep any though, as my Canon long lenses are extremely good and I have no reason not to use them.

Here is a direct comparison between an Olympus 75-150 and Canon's famed 70-200/f2.8 (it's too big for the blog)
http://www.potd.com.au/samples/oly75-150/Oly-CanonTest.jpg

...as you can see from the linked image, the Olympus is quite the performer and takes it to the Canon quite well, matching detail and sharpness, although it's slightly underdone on contrast. (This is easily fixed in Photoshop however)


What about AF?

Naturally manual focus lenses don’t magically become auto focus lenses when plugged into an auto focus camera, so a bit “old school” technique must be employed. (I will guess that at least some of the people reading this have never used a manual focus camera before…… geez I feel old!)

Manual focusing takes practice and often, best results are achieved using the “focus though” method. This is where the focus ring is turned past the point of focus to where the image is soft again. At this point the focus ring is turned in the reverse direction, again past the point of focus to a point where the image once again appears soft.

This is repeated two or three times, decreasing the amount of "focus through", until the photographer can easily recognise the actual point of focus. With practice, this method becomes second nature, fast and quite accurate.

Having said that, the most common DSLRs now use an image capture area smaller than that of the older 35mm film SLR cameras. This results in a smaller view finder and this makes manual focusing that much harder.

Luckily some clever lad has come up with a way trick your camera into thinking that the old manual focus lens, is actually a new auto focus lens. This is done by including an AF circuit on the lens adapter…. As far as your camera is concerned, it is wearing an AF lens and the focus confirm light and beep work as normal. What a clever little lad!!

Another option is interchangeable focusing screens. If your camera offers this feature, you can install a “split screen” that will aid with manual focusing. These screens have a centre circle that is split in two and when the two halves line up, the image is focused. (I personally use a split screen)

OK that’s focus, but what about exposure and stopping the lens down?

Well the camera can’t stop the lens down, it just doesn’t have the mechanical connection needed, so this must be done manually by turning the lens’ aperture ring. As the aperture closes, the image within the viewfinder will darken, so it is best to focus first, then stop down. (You won’t be shooting much sport with these lenses)

Your camera will set the exposure based on the stopped down lens and if using Av (aperture priority) it will do so automagically. If using M (manual) it is a simple matter of setting the correct shutter speed for the aperture using your camera's viewfinder exposure meter or a handheld meter. (It should be noted that Tv (Shutter Speed Priority) cannot be used, due to the camera not having control of the aperture as previously mentioned.)

Is it worth the effort? Stopping lenses down, putting up with dark viewfinders, having to focus the lens manually…..?

Heck yes! If you are like me, you crave the best image quality that is possible. The extra resolution that a good lens produces will take an image to a new level. You may not notice this at smaller print sizes, but start doing big enlargements and you will easily see the difference that a good lens makes.

So where do I get an adapter?
(Please note update below)

Ebay is the best place to start as there are always heaps advertised, but be willing to do some homework before you jump in. There are plenty of cheap ones out there at least some of them are not worth the risk. Remember, we are dealing with optics here and the machining involved must be precise.

Many adapters are produced by hand and this means that variation in thickness is not uncommon. I purchased one of the cheaper adapters in the beginning, but soon found that I could not infinity focus thanks to an inaccurate adapter thickness.

Adapter accuracy becomes even more important when zoom or internal focusing lenses are used, as Kennedy McEwen pointed out in a news group recently....

"If you are using a zoom lens then the wrong adapter thickness, whether too thick or too thin, will result in the focus drifting with zoom. So you might get excellent manual focus at the long end of the zoom and find the focus shifting when you pull back to the wide end of the zoom.
All of my OM lenses have separate zoom and focus rings and hold their focus excellently throughout the range. This seems to be typical of older MF lenses, while AF lenses which can rely on the electronics correcting any mis-focus as soon as the shutter is pressed, and it is a shame to lose that reliability because of a cheap adapter.

Also, lenses which use internal focussing mechanisms (rather than shifting the entire optical assembly back and forth) rely on the correct backworking distance for optimum performance. A poor adapter can result in sub-optimal lens performance, with resolution much lower than it should be." Kennedy McEwen.


So when you find an adapter on eBay, be sure to ask the seller questions about the accuracy of it's build and also their return policy.

I have since moved to a much more expensive Kindai adapter (AUD200+) and it is machined beautifully. Coming from a CNC machine rather than a set of hands, guarantees accurate thickness and ZERO variation.

Kindai don't offer AF module adapters however, but I am quite happy with my slit-screen focusing for now.

So that's a bit about using Olympus lenses on your Canon SLR. If you have any specific questions, please feel free to ask them in the comments area.

Also see: http://russellspixelpix.blogspot.com/2007/11/focus-confirm-adapters-vs-split-screen.html


Cheers

Russell
AustralianLight Landscape Photography: http://www.australianlight.com.au


Update - March 2011: After having another look at today's available adapters, I would suggest that the Fotodiox Pro range is definitely worth considering. As well as the adapter shown here, Amazon also offers budget and AF confirm versions....


Tags: olympus om lens canon eos adapter zuiko lenses canon body dslr slr focus confirm chip alternate lenses


Saturday, 9 June 2007

Rusty's Ramble #4: "If you build it, he will come"

"If you build it, he will come" (it's a line from a Kevin Costner movie) or in photo speak... "If you wait, the image will come".

Just a quick ramble about an image that I shot this afternoon.


I drove up to the Qld Sunshine Coast for some R&R and camping today. 2.5 hours from home and I am dealing with freezing temps, gale force winds and the difficulty of finding something worth photographing.

Shortly before sunset I had just about given up, in fact I had given up, but I forced myself to get the cam out and take at least one pic so that the day wasn't a complete waste.

I looked around were I just happened to be and figured that "I may get a shot down there". So I set up for what was a very ordinary shot in dull light. While doing this the phone rings and my wife is calling me back to camp to pack up and go home.... "it's too cold and sleeping in a tent is just not on!"

So I have a dull and boring shot, I have a freezing wind that is sending brass monkeys looking for welders and I have my lovely wife in my ear saying "let's go".

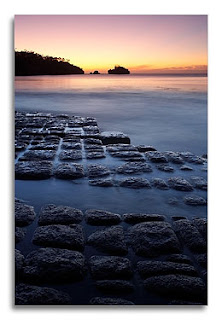
Then just for a few seconds this happens.... 


...the light broke through the clouds and lit the scene in a way that I had never even hoped for.

So the moral of this very brief ramble?

"Wait it out till the light is gone, because you just never know what will happen."

Sunsets and sunrises change quickly and if you are not ready and waiting, you may miss something special. (I am not saying that this image is anything fantastically special.... it's just something that I was not expecting, that came out of absolutely nothing and then it was gone)


Cheers

Russell
My Gallery: http://www.pixelpix.com.au/gallery
Australian Digital Photo Of The Day: http://www.potd.com.au

Photography help for beginners - Film & Digital Camera Techniques - Post Processing - Photography tips and tricks - Rusty's Ramble


Thursday, 7 June 2007

Tip 7: Panoramic photography on the cheap!

I am in process of moving my blog to my AustralianLight Landscape Imagery web site. Please find an updated version of this article at http://www.australianlight.com.au/blog/post/a_beginners_guide_to_shooting_panoramic_images/

The Poor Man's Pano Head

Not being one to shell out the big bucks if I can make it myself... I set out to make a cheap panoramic head that would provide me with nodal point rotation.


First place was eBay looking for a macro focusing rail. I was lucky enough to find an AU seller with an Olympus rail that had been listed only moments before and it had a "Buy Now".... sweet! So 2 mins and $49 later it was mine. (I also noticed that the same seller had a set of extension tubes.... I figured "Heck, I have a macro focus rail... I might as well have some macro as well!! "Another 2 mins and $20 and they too were mine)

I was very pleased when the items arrived, as they were brand spanking new!!! I seriously doubted that these had even been close to a camera! The Olympus rail is extremely solid and well built and I couldn't have been happier with the purchase.

Ok... so I got the rail, next step was to mount the camera in vertical orientation. A quick stop at the local hardware and a $3 bracket (yet to be painted in the pix) was purchased. 2 small holes were drilled... one to mount the camera and the other to mount the bracket to the rail
(in a position with the lens over the rail)
and bingo!... a Panoramic head for less than AU$55!!!!


On this image I have marked the offset so that you can see how the camera rotates around the lens nodal point. This means that no matter where the camera points during it's rotation, the camera-subject relationship does not change.

Nor does the relationship between obje
cts at different distances change.... so when stripping together everything matches and blends perfectly.
The macro rail is perfect for this application, as it allows fine offset adjustment so that the lens nodal can be found for different focal lengths.


Interesting side note: Thanks to the internal zoom, the nodal point for the 17-40 L does not change throughout it's zoom range. This makes compositional changes very easy once the head is set at the nodal.

I have plans for a second bracket that will hold a flash above the nodal. This flash will be used with my "tracing paper" diffuser (more on that in another blog later) in the vertical position and allow for smooth internal exposures without multiple shadows.

What’s this “nodal” thing again?

Your camera lens projects a reverse image…. while cleaning your lenses, you may have seen that the image through the lens is upside down and back-to-front.
No, you haven’t seen this? OK then, try it now…. Remove the lens from your SLR and look through it (sorry compact camera owners with fixed lenses, you don’t get to play this game) and you will see everything is flipped in both the vertical and horizontal directions.

So given that this is the case, we know that the light that enters the front of the lens on the right, exits the lens on the left….. and conversely, the light that enters on the left, exits on the right. From this we can rightly assume that at some “point” within the lens, the light “crossed”.
This point is the “nodal point” or effectively the “optical centre” of the lens (not the physical center… measuring the outside of the lens and dividing it in half is meaningless…. unless you want to know how long half your lens is).

So why is this important to us photographically?

Imagine yourself sitting on the outside row of a merry-go-round. (not the gold horsie… that one’s mine, you can have the silver one) Look out from your position to a friend who is standing still and watching (They are thinking… “How embarrassing is this!! A 43 year old goose riding a merry-go-round…. Sheesh!”)
Your friend has just won a stuffed animal and is hiding it behind their back (you are now thinking…. “How embarrassing is this!! A 43 year old goose winning stuffed animals…. Sheesh!”)

As the merry-go-round rotates, your position in relation to your friend changes…. As your position changes you get to sneak a look behind your friends back and see that it’s an elephant (….bugger! You wanted the giraffe!).

Now change positions on the merry-go-round and imagine that you are standing in the dead centre. As the merry-go-round rotates your position in relation to your friend does not change. At no time are you placed in a better position to see what your friend is hiding behind their back.

This is what is important to us as photographers…. We can rotate the camera taking multiple images and each image will overlap with the previous, because at no time will the camera see anything that is hiding behind some thing else, it will effectively take one big photo over multiple frames. (More important, is the fact that the disappointment of getting an elephant and not a giraffe is postponed for a little while longer) ;-)


Let's look again at the 2nd image above... Here you can see that the camera does NOT rotate around it's own base, instead it rotates around a point located within the lens and above tripod centre .... this is the lens nodal.


This diagram shows how nodal rotation does not effect the relationship between objects.

Nodal rotation
allows for easy stitching of images because (and to put it quite simply), everything lines up no matter where you point the camera.


The following diagram shows how objects appear to move in relationship to each other, when a camera is rotated around a point other than the nodal.
(eg the camera base mount)

This presents impossible challenges for stitching, as no two areas that you are trying to blend will be the same. This can be overcome ONLY with physical intervention on the image in post process and when you may have as many as 15 images to blend, do you really have the time?

Nodal rotation is much easier and no matter what you paid for your pano head, it will seem cheap in the long run with the time that you will save!!


At this point, I will take a moment to mention that hand-held panoramas are possible, but these are best kept for compositions with distant subjects only.


So how do we determine the nodal?


There are a number of databases available on-line that will let you know the offset required.... these are great for fixed focal lengths, but are of little use when you are using a zoom
, because each time you position the zoom, can you really be sure of the exact focal length that you have selected??

From my experience with this, I have found that s
etting the nodal by eye is very effective and accurate. To do this, pick 2 objects at different distances (larger distances are better) and position them in the right of frame. Note the relationship between these objects (eg are they aligned, one just touches the other etc).

Now rotate the camera and position the same objects in the left of frame. Again note their relationship, has it changed?? If it has changed you have not rotated around th
e lens nodal. Adjust the offset distance and repeat the test.

After a little bit of tweaking you will find the nodal and see that le
ft frame/right frame views of your objects do not change. Now you are ready to take some panos!

Tripod setup:
Yes you MUST use a tripod if nodal rotation is required, as this relies TOTALLY
on the fact that there is a fixed point of rotation. You cannot hand hold and rotate around a nodal, it is simply not possible.

Make sure that your tripod has a firm footing on the ground. Using a level (some tripods have levels built in) and the tripod's adjustable legs, make sure that the base plate of your tripod hea
d is level in all directions.

Still using the level, make sure that your tripod's top plate (where the camera normally sits) is also level in all directions. Now carefully place your camera/pano head and secure it well.

Oh... I should mention, it is really nice to use a solid stable tripod. A camera, lens and pano head can be quite a load with the offsets involved and fiddly little tripods are not recommended.


Landscape or Portrait? Well you can shoot in both, but I feel that portrait orientation is best. Why? ...I am glad you asked. When you think about it, a panorama gives you the ultimate wide angle lens. In fact every lens in your kit becomes a wide angle that is capable of a full 360 degrees (you can keep going round and round if you wish), so why not maximise your vertical FOV (field of view) by turning your camera into the portrait position.

Image overlap: When taking images make sure that each image overlaps the last be at least 1/3 (1/2 is better) as this will give your panorama software (I use PTGui) plenty of room to find points of alignment and plenty of room for your blending software (I use SmartBlend within PTGui) to make smooth, invisible transitions.

Exposure: You will need to fix your exposure from the start, so that it remains constant for ALL shots. If you allow your exposure to vary you will not get smooth transitions across your panorama image. Here I recommend shooting in manual mode and setting the exposure to just maintain detail in the brightest part of the image.

Large rotations can provide great variation in exposure and I think it best to maintain highlight detail and pull detail out of the shadows later if required. (Remember, if you blow the hightlights there is nothing left to recover in post.... blown is blown!)

Focus: I have found that using a common focus for all images works well. Stopping down your lens for lots of DOF will keep both near and far objects acceptably sharp with this technique, but depending on the effect you are after, you can elect to have shallow DOF or selective focus just as you would in a normal single frame shot.

If your subject distance varies greatly with the rotation, you can even focus with each frame and allow the focus differences to blend from frame to frame. Experiment with this and see what works for you. Sometimes this technique is successful, sometimes not.... it depends on the variation in the subject distance.

Focal length: Panoramas can be made from any focal length provided that your lens does not provide uncorrectable curvilinear distortion. (eg super wide angle or fisheye lenses)

So pick your focal length to suit your subject. In this image I am only interested the distant view and the close foreground is not important. So I have used a longer focal length of 112mm (70mm on 20D). If I had used a wide angle lens the more distant objects would have been quite small....


View this image large: http://www.potd.com.au/gallery/albums/userpics/10002/ABigWideLand.jpg

In this image I wanted more foreground and sky, so a wider focal length was used...


View this image large: http://www.potd.com.au/gallery/albums/userpics/10002/HighOnAHill_Stitch.jpg

So that's the images... now how to stitch them?? Well there are a number of applications that are available to do this and I will let you find one that floats your boat, but I will recommend PTGui and the Smartblend plugin http://www.ptgui.com/ as I have found the results nothing but excellent!!
I should also mention that it is wise to overshoot your panorama by 2 or 3 frames each end. When being stitched the individual images are "warped" to fit together, the is means the final result tapers at each end.

This is not a problem if you don't mind cropping some off top and bottom, but when you are a megapixel monster like me, you want every bit of image data that can be salvaged. So over shooting moves the taper out to unwanted sections of the image, these can then be cropped off the end without effecting image height.

One last thought..... Don't be afraid to try different subjects. Many panoramas are of landscapes and the pano format is perfectly suited for this, but panos can also be fun even in tight situations....

It's up to your imagination where you think you could use the panorama view.


These and some of my other panoramas can be viewed at my gallery link below. When in the gallery, please search "pano".

Cheers

Rusty

AustralianLight - Landscape Photography


UPDATE: Panoramic photography on the cheap! - PART 2 is now online.


Tags: panorama panoramic pano landscape image photo photography wide format 16x9 617


Tuesday, 29 May 2007

Rusty's Ramble #3: Olympus OM-1n

Well today my new camera arrived!! At last I have a near MINT condition Olympus OM-1n. (Seen here with the amazing 50mm f1.2)

Back in my college days I was using an Olympus OM10 (with manual adapter) and while this was a fine bit of kit at the time, my dream was to have the Olympus flagship, the OM-1n. This was naturally way out of my league being a student and by the time money was more available, my camera needs had moved into the medium to large format area.

So now after 27 years have past, I am finally living my almost forgotten dream.

"Why?" I hear you ask.... "Why not?" I say.

A camera like this still has it's uses. Sure it uses that floppy rollie stuff that comes in a can... forget what it's called at the moment.... but given that the floppy rollie stuff will be around for a little while yet, it will be fun to do some things that the current crop of digital simply cannot.

"Like what?" ...Well it can be used on an aircraft for one, even when they tell you to put all electronic gear away. It can be used in extreme temperatures where most digitals would fail and it can do longer exposures than any digital camera could ever hope to do.

"How so?" ....you do like your questions, don't you...... All these things are possible, because the Olympus OM-1n is a mechanical camera! Yep, you heard right.... a MECHANICAL camera!

It is full of gears, levers and springs and NO electronics. Ok, so it has a light meter and a battery, but the battery is ONLY for the light meter and the camera will still operate without both! You just need to apply some of the old "Sunny 16" type of rules (or use an external light meter) and you can happily click away without even having a battery in the cam.

So what do I intend to use it for..... starting arguments with air hosties when I refuse to put my camera away? ....travelling into the extreme low temps of Antarctica? ....or making long, looooong exposures of star trails?

Well I plan to use it as a star trail camera. My Canon 1Ds Mk2 is quite a weapon, but even it likes to go no longer than about 30 mins in any one exposure. To go beyond that means that noise becomes an issue, as does the battery life because of the subsequent noise reduction "dark frame" exposure.

The OM-1n will happily stay open for ever, so 3 or maybe 4 hour exposures are my target, as these will provide a good length of trail.

What's that? You think you know me and you can't believe that I will only use it for that? Well I guess you are right.... I will use it for other bits and pieces when shooting film would be fun and I can promise that the odd air hostie or two will be put to the test. ;-)

Oh! I almost forgot..... Lenses.... I didn't buy any, as I already have a host of Olympus lenses that I use on my 1Ds Mk2, so adding an Olympus body was always a given really.

Cheers

Rusty
Australian Digital Photo Of The Day: http://www.potd.com.au


Photography help for beginners - Film & Digital Camera Techniques - Post Processing - Photography tips and tricks - Olympus OM-1n.


Tip 6: Level Landscape Horizons.


Watch that landscape horizon! ...as our brains are well accustomed to perceiving the horizon as level, regardless of the position or tilt of our heads.
So when we see a horizon off-level in an imaged, most of us react with a “something is not right here” feeling and this can turn an otherwise outstanding image into something quite ordinary for the viewer.
Naturally, our first chance to ensure a level horizon is at the time of capture. The landscape photographer simply needs to stop and look…. Sadly this is something that is not done often enough, as we tend to focus on other elements within the viewfinder rather than the distant horizon.

Having said that, it is not as easy as it sounds. Compact cameras (film & digital) have never provided large viewfinders and the popular "non-full frame" DSLR cameras have viewfinders smaller than their film using or "full frame digital" SLR counterparts. This smaller view does not lend itself well to assessing the horizon, but luckily there are some aids to help the photographer.

The Bubble Level


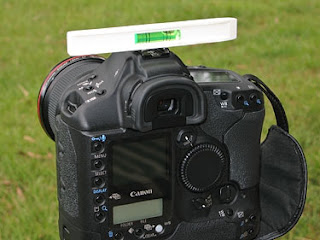
Yep, as simple as it sounds, that little bubble inside a liquid filled plastic tube can be a valuable tool to the photographer.... with careful use, horizons can be positioned very close to perfect, without the need to even look through the view finder.


Bubble levels are available from most camera stores (normally ordered in) and they are designed to slot into your camera's flash hot shoe. Both single and double levels are available, with the later useful for vertical orientated photographs. Be ready for a bit of a shock to the hip pocket though, as that that little bubble of air will set you back up to $75 Australian!!


A cheaper option is a small plastic level from your local hardware and this can be held across your hot shoe when required (The hot shoe is always a level part of your camera in relation to your film or sensor). This is not much good for vertical orientation or when you have no hot shoe, but generally there is something on your cam (like the edge of the LCD or even the camera itself) that can be used to position the level against. This is not as convenient as the true hot shoe level, but for the dollars saved it's worth the extra effort.


Viewfinder Grids


Some cameras have a grid etched into the focus screen and is visible through the viewfinder. These are great, as it's a simple matter of lining up your horizon to be parallel with the closest grid line.


If you don't have this, you may be able to have it installed on your SLR (www.brightscreen.com), or if you have a removable focus screen, it is a simple matter of popping out the old and popping in a new grid screen.


If you are using a compact camera you may have little choice here, but some digital compacts allow a "grid overlay" option and this electronically creates a grid on the LCD screen.

LCD screens on Digital Cams


Most DSLR cameras don't allow the LCD to be used as a viewfinder, but this is how many compact cameras operate. The often larger view provided by these is of great assistance in positioning the horizon, especially if you have the grid overlay function as mentioned above.


Focus Points


While this is not their intended use, the focus points visible through the viewfinder are positioned level and can be used to assist your composition.

Tripods

Tripods are invaluable in landscape photography, as they provide the photographer the ability to get it exactly right and leave it there! When using tripods, photographers tend to take a little more time with composition and this allows us to concentrate on individual elements within the view finder, rather than an "all at once" approach that is normal when hand holding the camera.

Plus many tripods and tripod heads come with built in bubble levels!!

So what about after the image is captured? How do we fix horizons then?


Well if you are shooting film and getting your images processed at the local mini-lab, your control may be limited. In the the old days of enlargers (where a light was shone through the negative to project an image on the paper below) it was a simple matter of adjusting the angle of the paper to suit.


More modern techniques of scanning and digital printing have removed the enlarger from most mini-labs these days, so in many cases your images are produced "as-is" in a largely automated process. Should you need an image modified in any way, it can be re-run on it's own (at a slightly higher price than the automated batch process originally done) with the operator applying the required adjustments, either in their print software, or by first opening the image in photo editing software like Photoshop.


Photoshop and/or it's cheaper sibling Photoshop Elements (there are more photo editing packages... please Google for info) is a must for any photographer who wished to take control and provide the lab with "print ready" images. This is especially so for those Photographers using digital, but just as relevant for film users having their images scanned.


Here are a few pointers for Photoshop leveling....

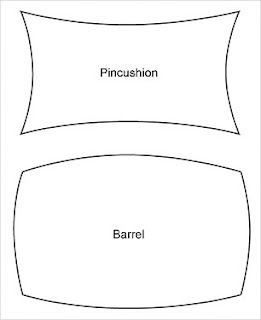
First of all we need to check that the horizon is actually straight, as lens characteristics can often bend straight lines and horizons... this is known as Curvilinear Distortion. There are two main types of curvilinear distortion that will be most obvious in our images (especially when wide angle lenses are used) and these are "barrel" and "pincushion" distortion.


As can be seen in the diagram, barrel distortion distorts in an outward fashion, while pincushion distorts inward.
If your lens produces either of these distortions, you may find that your horizons are quite curved in appearance.

If this is the case, you need to decide if it's something that degrades of enhances it. Personally I like to see straight horizons "most of the time" but sometimes when shooting wide angle, curved horizons can add to the wide effect and enhance the image's appeal.


So if you like it.... leave it! If you don't like it, then now is the time to fix it "before" any levelling is carried out.


How to fix it?
Photoshop offers tools that can do just about anything, but I will admit to taking the easy road on this one and recommend that you purchase a copy of PTLens.

PTLens is a great program that makes distortion correction easy. .....Why muck around when someone has done all the hard work for you?

Now that you have fixed the distortion with PTLens you can move on to levelling that horizon and the easiest way that I have found is using Photoshop's "measure" tool.....


Step 1: Locate Photoshop's "Tool Pallette"
Step 2: Click and hold the "Eyedropper" tool

This will bring out a new selection of tools from the one button.


Step 3: Click on the "Measure" tool"
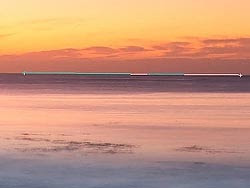
Step 4: Click and hold your cursor on the horizon, as far left in the image as possible.
Step 5: Drag while still holding the mouse button down, across to the horizon as far right as possible and release the mouse button.

While doing this, you should have seen a line with 2 end crosses be created. This line should be directly over your existing "un-level" horizon. The reason I suggest measuring from far left to right, is that a measurement over a greater distance will be more accurate.

It will also allow for cases where the photographer has elected to keep curvilinear distortion in place, as effectively this method levels the "sides" and ignores the curve.


Step 6: Go to your Photoshop menu (up top of the Photoshop window) and select Image>>>Rotate Canvas>>Arbitrary

Now you should see a "Rotate Canvas" tool palette open and it will have an angle listed and either CW or CCW checked. Do NOT change this, as this is the angle of the line that your measure tool just created.

Step 7: Click OK

This will rotate the entire image by the listed the amount and your horizon will now be level. You will also notice that your canvas has grown, as Photoshop needed space to rotate the image into. This extra space can now be removed using the crop tool.

So there you have it, just a few simple clicks and you can adjust your horizon level in a VERY accurate way.

Tip 1: When Photoshop enlarges the canvas, it will use by default, the background colour as selected in your tools palette. If you are rotating an image with lots of dark areas you may wish to ensure that your background colour is set white, as this will allow you to see the image edge when cropping. Naturally, for light images a darker background colour works best.

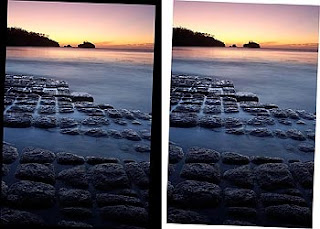
This sample displays how the dark areas of the image are easily lost into the black canvas, while the white canvas makes it easy to see the image edge.

Tip 2: Don't work with your image too small on screen. A larger image will allow for more accurate use of the measure tool.

Tip 3: Try and get you horizon as close to level when taking your image, as the greater the correction required, the greater the image area lost to cropping.

Tip 4: It is possible to use an un-level horizon for dramatic effect with landscapes, just make them un-level enough for the viewer to understand that it is intentional. Too small an amount and the viewer is left in that grey area of "did the photographer mean to do this, or has the photographer simply stuffed up?" and that is a place we do not want our viewers to go!

Cheers

Rusty
Australian Digital Photo Of The Day: http://www.potd.com.au

Thankfully the insane prices that I mentioned above have finally come down....


Tags: photo photography photographic bubble level horizon spirit level