AustralianLight - Landscape Photography AustralianLight - Landscape Photography

AustralianLight - Landscape Photography is my new site with my good mate Bernie. If you have found my blog posts useful over the years, then how about giving us a hand to promote AustralianLight.

We are doing everything we can to get our australian landscape photography out there and guess what..... it's bloody hard work!! So please visit the gallery and if you like what see, share it with your friends.

Thanks, we really do appreciate your help. - Russell

Tuesday, 29 May 2007

Rusty's Ramble #3: Olympus OM-1n

Well today my new camera arrived!! At last I have a near MINT condition Olympus OM-1n. (Seen here with the amazing 50mm f1.2)

Back in my college days I was using an Olympus OM10 (with manual adapter) and while this was a fine bit of kit at the time, my dream was to have the Olympus flagship, the OM-1n. This was naturally way out of my league being a student and by the time money was more available, my camera needs had moved into the medium to large format area.

So now after 27 years have past, I am finally living my almost forgotten dream.

"Why?" I hear you ask.... "Why not?" I say.

A camera like this still has it's uses. Sure it uses that floppy rollie stuff that comes in a can... forget what it's called at the moment.... but given that the floppy rollie stuff will be around for a little while yet, it will be fun to do some things that the current crop of digital simply cannot.

"Like what?" ...Well it can be used on an aircraft for one, even when they tell you to put all electronic gear away. It can be used in extreme temperatures where most digitals would fail and it can do longer exposures than any digital camera could ever hope to do.

"How so?" ....you do like your questions, don't you...... All these things are possible, because the Olympus OM-1n is a mechanical camera! Yep, you heard right.... a MECHANICAL camera!

It is full of gears, levers and springs and NO electronics. Ok, so it has a light meter and a battery, but the battery is ONLY for the light meter and the camera will still operate without both! You just need to apply some of the old "Sunny 16" type of rules (or use an external light meter) and you can happily click away without even having a battery in the cam.

So what do I intend to use it for..... starting arguments with air hosties when I refuse to put my camera away? ....travelling into the extreme low temps of Antarctica? ....or making long, looooong exposures of star trails?

Well I plan to use it as a star trail camera. My Canon 1Ds Mk2 is quite a weapon, but even it likes to go no longer than about 30 mins in any one exposure. To go beyond that means that noise becomes an issue, as does the battery life because of the subsequent noise reduction "dark frame" exposure.

The OM-1n will happily stay open for ever, so 3 or maybe 4 hour exposures are my target, as these will provide a good length of trail.

What's that? You think you know me and you can't believe that I will only use it for that? Well I guess you are right.... I will use it for other bits and pieces when shooting film would be fun and I can promise that the odd air hostie or two will be put to the test. ;-)

Oh! I almost forgot..... Lenses.... I didn't buy any, as I already have a host of Olympus lenses that I use on my 1Ds Mk2, so adding an Olympus body was always a given really.

Cheers

Rusty
Australian Digital Photo Of The Day: http://www.potd.com.au


Photography help for beginners - Film & Digital Camera Techniques - Post Processing - Photography tips and tricks - Olympus OM-1n.


Tip 6: Level Landscape Horizons.


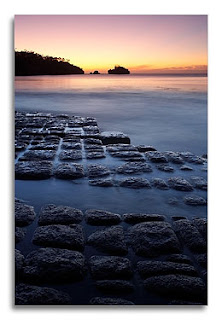
Watch that landscape horizon! ...as our brains are well accustomed to perceiving the horizon as level, regardless of the position or tilt of our heads.
So when we see a horizon off-level in an imaged, most of us react with a “something is not right here” feeling and this can turn an otherwise outstanding image into something quite ordinary for the viewer.
Naturally, our first chance to ensure a level horizon is at the time of capture. The landscape photographer simply needs to stop and look…. Sadly this is something that is not done often enough, as we tend to focus on other elements within the viewfinder rather than the distant horizon.

Having said that, it is not as easy as it sounds. Compact cameras (film & digital) have never provided large viewfinders and the popular "non-full frame" DSLR cameras have viewfinders smaller than their film using or "full frame digital" SLR counterparts. This smaller view does not lend itself well to assessing the horizon, but luckily there are some aids to help the photographer.

The Bubble Level


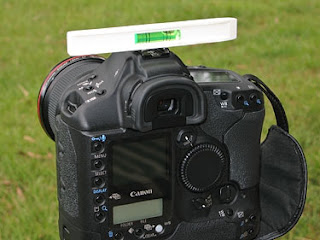
Yep, as simple as it sounds, that little bubble inside a liquid filled plastic tube can be a valuable tool to the photographer.... with careful use, horizons can be positioned very close to perfect, without the need to even look through the view finder.


Bubble levels are available from most camera stores (normally ordered in) and they are designed to slot into your camera's flash hot shoe. Both single and double levels are available, with the later useful for vertical orientated photographs. Be ready for a bit of a shock to the hip pocket though, as that that little bubble of air will set you back up to $75 Australian!!


A cheaper option is a small plastic level from your local hardware and this can be held across your hot shoe when required (The hot shoe is always a level part of your camera in relation to your film or sensor). This is not much good for vertical orientation or when you have no hot shoe, but generally there is something on your cam (like the edge of the LCD or even the camera itself) that can be used to position the level against. This is not as convenient as the true hot shoe level, but for the dollars saved it's worth the extra effort.


Viewfinder Grids


Some cameras have a grid etched into the focus screen and is visible through the viewfinder. These are great, as it's a simple matter of lining up your horizon to be parallel with the closest grid line.


If you don't have this, you may be able to have it installed on your SLR (www.brightscreen.com), or if you have a removable focus screen, it is a simple matter of popping out the old and popping in a new grid screen.


If you are using a compact camera you may have little choice here, but some digital compacts allow a "grid overlay" option and this electronically creates a grid on the LCD screen.

LCD screens on Digital Cams


Most DSLR cameras don't allow the LCD to be used as a viewfinder, but this is how many compact cameras operate. The often larger view provided by these is of great assistance in positioning the horizon, especially if you have the grid overlay function as mentioned above.


Focus Points


While this is not their intended use, the focus points visible through the viewfinder are positioned level and can be used to assist your composition.

Tripods

Tripods are invaluable in landscape photography, as they provide the photographer the ability to get it exactly right and leave it there! When using tripods, photographers tend to take a little more time with composition and this allows us to concentrate on individual elements within the view finder, rather than an "all at once" approach that is normal when hand holding the camera.

Plus many tripods and tripod heads come with built in bubble levels!!

So what about after the image is captured? How do we fix horizons then?


Well if you are shooting film and getting your images processed at the local mini-lab, your control may be limited. In the the old days of enlargers (where a light was shone through the negative to project an image on the paper below) it was a simple matter of adjusting the angle of the paper to suit.


More modern techniques of scanning and digital printing have removed the enlarger from most mini-labs these days, so in many cases your images are produced "as-is" in a largely automated process. Should you need an image modified in any way, it can be re-run on it's own (at a slightly higher price than the automated batch process originally done) with the operator applying the required adjustments, either in their print software, or by first opening the image in photo editing software like Photoshop.


Photoshop and/or it's cheaper sibling Photoshop Elements (there are more photo editing packages... please Google for info) is a must for any photographer who wished to take control and provide the lab with "print ready" images. This is especially so for those Photographers using digital, but just as relevant for film users having their images scanned.


Here are a few pointers for Photoshop leveling....

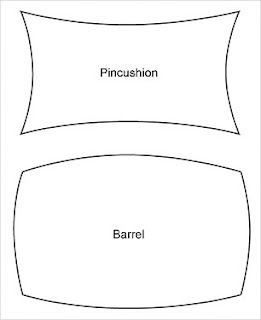
First of all we need to check that the horizon is actually straight, as lens characteristics can often bend straight lines and horizons... this is known as Curvilinear Distortion. There are two main types of curvilinear distortion that will be most obvious in our images (especially when wide angle lenses are used) and these are "barrel" and "pincushion" distortion.


As can be seen in the diagram, barrel distortion distorts in an outward fashion, while pincushion distorts inward.
If your lens produces either of these distortions, you may find that your horizons are quite curved in appearance.

If this is the case, you need to decide if it's something that degrades of enhances it. Personally I like to see straight horizons "most of the time" but sometimes when shooting wide angle, curved horizons can add to the wide effect and enhance the image's appeal.


So if you like it.... leave it! If you don't like it, then now is the time to fix it "before" any levelling is carried out.


How to fix it?
Photoshop offers tools that can do just about anything, but I will admit to taking the easy road on this one and recommend that you purchase a copy of PTLens.

PTLens is a great program that makes distortion correction easy. .....Why muck around when someone has done all the hard work for you?

Now that you have fixed the distortion with PTLens you can move on to levelling that horizon and the easiest way that I have found is using Photoshop's "measure" tool.....


Step 1: Locate Photoshop's "Tool Pallette"
Step 2: Click and hold the "Eyedropper" tool

This will bring out a new selection of tools from the one button.


Step 3: Click on the "Measure" tool"
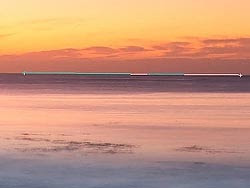
Step 4: Click and hold your cursor on the horizon, as far left in the image as possible.
Step 5: Drag while still holding the mouse button down, across to the horizon as far right as possible and release the mouse button.

While doing this, you should have seen a line with 2 end crosses be created. This line should be directly over your existing "un-level" horizon. The reason I suggest measuring from far left to right, is that a measurement over a greater distance will be more accurate.

It will also allow for cases where the photographer has elected to keep curvilinear distortion in place, as effectively this method levels the "sides" and ignores the curve.


Step 6: Go to your Photoshop menu (up top of the Photoshop window) and select Image>>>Rotate Canvas>>Arbitrary

Now you should see a "Rotate Canvas" tool palette open and it will have an angle listed and either CW or CCW checked. Do NOT change this, as this is the angle of the line that your measure tool just created.

Step 7: Click OK

This will rotate the entire image by the listed the amount and your horizon will now be level. You will also notice that your canvas has grown, as Photoshop needed space to rotate the image into. This extra space can now be removed using the crop tool.

So there you have it, just a few simple clicks and you can adjust your horizon level in a VERY accurate way.

Tip 1: When Photoshop enlarges the canvas, it will use by default, the background colour as selected in your tools palette. If you are rotating an image with lots of dark areas you may wish to ensure that your background colour is set white, as this will allow you to see the image edge when cropping. Naturally, for light images a darker background colour works best.

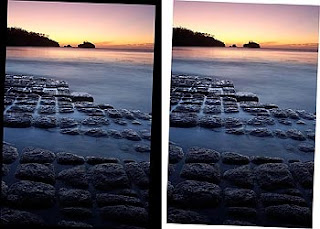
This sample displays how the dark areas of the image are easily lost into the black canvas, while the white canvas makes it easy to see the image edge.

Tip 2: Don't work with your image too small on screen. A larger image will allow for more accurate use of the measure tool.

Tip 3: Try and get you horizon as close to level when taking your image, as the greater the correction required, the greater the image area lost to cropping.

Tip 4: It is possible to use an un-level horizon for dramatic effect with landscapes, just make them un-level enough for the viewer to understand that it is intentional. Too small an amount and the viewer is left in that grey area of "did the photographer mean to do this, or has the photographer simply stuffed up?" and that is a place we do not want our viewers to go!

Cheers

Rusty
Australian Digital Photo Of The Day: http://www.potd.com.au

Thankfully the insane prices that I mentioned above have finally come down....


Tags: photo photography photographic bubble level horizon spirit level


Wednesday, 23 May 2007

Submit your favourite techniques

I wish to expand this blog to provide a compendium of photographic capture and post processing techniques, for use by enthusiests and professionals alike.

This will provide those who volunteer the use of their submissions, valuable exposure for their business and/or art, thanks to the inclusion of contact details and advertisement within the submission itself.

In addition to this blog, the top 101 Techniques selected (actual number to be determined), may also be presented in a magazine format and this could provide even greater exposure for those who participate.

If you are interested, please s
end your submissions to blog@pixelpix.com.au today.

Please Note: It is intended that this information be made freely available to the end user both via this blog and/or PDF magazine download.


Cheers

Russell
My Gallery: http://www.pixelpix.com.au/gallery
Australian Digital Photo Of The Day: http://www.potd.com.au


Photography help for beginners - Film & Digital Camera Techniques - Post Processing - Photography tips and tricks -Submit your favourite techniques


Sunday, 20 May 2007

Tip 5: Graduated Neutral Density Filters

NOTE: I am in the process of moving this blog to our new web site. Because this blog will be removed in the near future, please share or link to the new location. Thanks 

http://www.australianlight.com.au/blog/post/graduated_neutral_density_filters/


Many of my landscape images have been captured while using Graduated Neutral Density filters or "ND Grads" (we also call them "Uber filters" over at POTD.com.au, that's because they are generally "uber expensive" lol)


ND Grads work in exactly the same way as regular neutral density filters, in that they reduce the amount of light entering the lens (see earlier ND Filter blog post), but they are as the name suggests "graduated".

This graduation from no ND effect to full ND effect, allows us to reduce the mount of light in one portion of the image, while the remainder is not effected.

The graduation or soft edge of the neutral density allows the photographer to blend the ND effect into the image and achieve a more natural appearance. This is not that easy though and careful selection/use of hard and/or soft graduations and subsequent positioning of these within your image is vitally important for good results.

I will expand on position techniques in a later blog, but before I do this we need to look at a few of the uber filter options available to you.

The Screw-on Filter:

Just like a regular UV filter (many of you will be using these for lens protection), the screw-on ND Grad is circular in shape and screws into your lens’ filter thread. They come in a variety of densities (how much they reduce the light) and edges (how soft or hard the transition is from clear to ND)… unfortunately though, there is no way to adjust the positioning of these filters within the frame.

It screws into the filter thread remember, so where the graduation is positioned is where it stays and there is no way of moving the filter up or down. You can rotate the filter however and this is handy to match off level features within your image, but not having the ability to move the filter up and down is a serious drawback.

For example, if your sunset horizon is 1/3 of the way down your image, you want to position your ND Filter 1/3 of the way down your image to reduce the bright sky and allow a more even exposure between the bright sky and darker foreground. If your Screw-on ND Grad has the ND ½ way on your filter (which they do) you have no option but to recompose your image so that the horizon is now ½ way down your image to match the filter.

This seriously affects compositional choices and for this reason alone, I would NOT recommend the purchase of “screw-on” ND Grads.

The Square Slide-in Filter:

This filter seems more practical, because no longer is the filter physically tied to the filter thread. Instead, a holder is placed on the lens and this holder provides the photographer with a slot, or slots, to slide one or more ND Grad filters into.

Sounds like a winner yes? ….sadly No. :-( The square shape of these filters does not provide the photographer with enough movement up and down, before the filter edge can be seen within the image, especially with the wider Field Of View seen in portrait orientation. These filters are only marginally better than the screw-on filter.

You can of course go to filter that is a bigger square and get greater movement, but these filters are more expensive and I am not sure they offer a great range of graduated effects.

The Rectangular Slide-in Filter:

Now we’re talking!! A rectangular filter is the obvious answer, as this provides us with extra space top and bottom and we can use this space to allow positioning of the graduation where we need it, without the filter edge creeping into our shot.

Like all of the filters mentioned so far, these come in a variety of graduations, intensities and sizes. The photographer will generally have a selection of these in the kit, as each image is different and will require a different filter, or combination of filters to achieve the desired effect.

Filter Width:

OK, so we are using rectangular filters to allow better positioning…. But what size?

This will depend on the focal length of your widest lens. Let’s imagine that we are taking a photo with the camera in landscape orientation (horizontal) and that we are using an ND grad to hold back the sky exposure. The filter will be positioned with it’s longest side vertical (it has to be because of the grad) and this leaves us with the filter’s short width to cover our camera’s Field Of View.

So the width of the filter needs to be great enough, so that the edge of the filter and in fact the filter holder itself, is not seen in the side of our images.

Unfortunately I have no magic formula for you here, but from experience I can tell you that if shooting at 16mm on a 35mm film camera or a full frame digital such as the Canon 1Ds or 5D, you will need to use the 100mm filter/holder system. This will generally allow 2 filters to be stacked, but a third will see the filter holder.

This holds true for focal lengths of 10mm when used on 1.5/1.6x cameras such as Nikon DSLRs or Canon D30/D60, 10/20/30D DSLRs etc.

Many people shooting with the 1.5/1.6x cameras never venture past the kit lens that came with their camera (generally around 18mm), so if this is you, you may like to consider the 84mm wide filter systems.

Regardless of the system that you choose, I would highly recommend a test run with your camera at local supplier prior to purchase. Take a few pictures at your widest focal length and check the image on your LCD for signs that you are seeing (or not) the filter edge/holder.

Remember, you MUST take a picture to test this, as it is only the high level professional bodies that offer 100% viewfinder coverage of what your sensor sees. Many camera viewfinders can be as low as 95% of what the sensor sees and this could easily hide a filter’s edge intrusion.

Note: Some manufacturers offer special “wide” adapters for their holders to help cope with the wide Field Of Views. These include a holder that is limited to a single filter and/or a special mount ring that sits back over your lens when screwed on, rather than out in front… ask you supplier about these wide solutions for the system you are considering.

OK, so now I know what size to get, but I am confused about stops and edges??

Let’s think about what you shoot then….

If you photograph landscapes with distant horizons that are basically straight and have no foreground elements that break into the sky area, then a “hard” edge filter would be useful. If you wish to simply darken the sky slightly, a 1-Stop filter would be useful. (Nice on those overcast days where cloud detail would otherwise be lost)

A 2-Stop filter would provide a greater darkening effect and a 3-Stop filter would be of benefit when the there is a large difference between sky and foreground eg at sunset.


Remember, you can stack the filters as well, so if you need more neutral density and really hold back the sky then stack your 2 & 3 Stop for 5-Stops!! (5 stops will most likely no longer look natural, but some great effects can be achieved)
My personal recommendation would be to have at least a 2 and a 3 Stop hard in your kit for “straight” horizon shots.


If you have image elements that break into the sky area (eg a building), the hard filters become less useful, as it is impossible to hold back the sky without effecting the building also. Here the “soft” edged filter is required, as the more gradual darkening that it provides is more appealing over foreground elements.

Again, good positioning is vital for good results, but there comes a point when one must consider that using any filter at all, may be detrimental to the image and perhaps a brighter sky is a better option if it maintains detail in other image elements. (If this is case, exposure bracketing and merging of these in post processing may be the answer, but we will talk more on this in a later blog.)

My personal recommendation would be to have at least a 2 and a 3 Stop soft in your kit for “broken” horizon shots.

Brands:

There are a number of brands available and the old adage "You get what you pay for!" seems to apply. I personally use "Lee Filters" as I find them to be excellent quality, neutral in colour (yes some of the cheaper brands are not exactly neutral) and quite scratch resistant.
"Singh-Ray" are also extremely good and offer some quite unique graduations and they can even make to order.

Another popular brand is "Cokin" ....I have used these in the past and my experience with them was not great, as I found they promoted a slightly magenta cast. Having said that, I will admit to only using the entry level filters from Cokin and cannot report one way or another on their "Pro" series filters, so by all means check them out.

There are other manufacturers like B&W & HiTech and I would suggest that you Google "neutral density filters" and do a little research to find what is right for you.

I hope this helps you understand Graduated ND a little more. I will be back soon with another blog on positioning these filters for best results.

Cheers

Rusty
AustralianLight - Landscape Photography


Photography help for beginners - Film & Digital Camera Techniques - Post Processing - Photography tips and tricks - Graduated Neutral Density Filters


Thursday, 17 May 2007

Rusty's Ramble #2: RAW v's JPEG

Photographing in the RAW

I am sure that the debate about RAW v’s JPEG is probably still raging in multiple locations around the web. Each have their uses, but for me (I repeat “for ME”) it’s RAW all the way.

Why RAW I hear you ask…… RAW is like film, it is all that your camera can capture, unlike JPEG that has thrown away image data in order to reduce the file size.

Reduced files sizes have their advantage of course…. Your camera can move images faster and clear the buffer more quickly, your memory card can fit more images, as can your computer or archive media. The biggest advantage is that your camera can process your images and they are ready to go with no need for further processing (assuming that your camera doesn’t make a motza of it!).

Reduced file sizes are not all roses though, as the “bits” that have been chucked away in the reduction process, are bits that can’t be called on later in post processing if needed… once they are gone, they are gone!

So if you are happy to accept the JPEG files that your camera offers, then that is just fine and I wish you all the best. But I hate the thought of not having everything available to me when I process my images. Having every bit of data that my camera captured offers me the chance to produce the best image that I could possibly make.

Plus image processing applications are getting better all the time, what if there is some wiz-bang new RAW converter in the future that can produce the most amazing quality yet? I know that I would be somewhat ticked-off if I couldn’t make use of the new wizzes and bangs!

But RAW takes soooooo long to process! ….Does it? In comparison to accepting JPEGs out of the cam it does, but what if you are like me and not one to accept out of cam images?

In my early days of digital I was shooting JPEG and I would come home from a sporting weekend with 500+ images. I would then spend the next day and a half opening each and every JPEG, making adjustments so that I was happy with them and then resaving them. This was VERY time consuming, but then I switched to RAW and cut my image processing time for 500+ images down to just a few hours.

This reduction in time was possible simply because of the way the RAW converter (Capture One being my weapon of choice) handles the images. At no time does it “open” the full image, it simply presents me with a screen resolution image on which I can base my processing choices. Once I am happy with the screen image, I send the image to convert, either immediately or in a queue for later.

Processing of each of my images to high quality TIFF takes around a minute (I use a 16.7mp camera so the images take some crunching)…. So 500 images takes a number of hours…. OK so you did the math and that’s a bit longer than I claimed earlier.

Let me explain….. the processing happens in the background and I don’t need to be sitting there watching it. So I can be happily snoring away, or spending time with the family, or be out taking more pix. I can also cut down this time if I want, by outputting to JPEG.

“HANG ON!! JPEG?? ….Make your mind up Russell!!!”

OK, let me explain again…. One of the truly fantastic features of Capture One (and other RAW converters) is that you can save your conversion settings. This means that there is no need for me to output huge TIFF files that take up truckloads of space on my hard disk. I can simply output to a medium quality JPEG at a much smaller file size and this is perfectly good enough for web display or cateloging in my image database.

Once a client picks an image to use, I can then go back to the RAW file, use the previously saved conversion settings and output a high resolution TIFF that is suitable for publishing or large print display. This saves GIGABYTES of space, removes a huge burden off the archive media and it perfectly matches the original output that the client has viewed!

Starting to make sense? I hope so, because I am the world’s worst typist and it has taken me ages to get this far. ;-)

So to wrap it up, I am a RAW user for a couple of main reasons…. The first and most important to me is the image quality. Many people will argue that you can’t tell the difference in the final print, but all I can say is that maybe they have never produced a 40+ inch wide print. Yes it’s a tossup in the smaller sizes, but print big and there is a difference.

The second reason is workflow. I find RAW so much quicker, but only because I am not one to accept an out of camera JPEG. As I said earlier, if you like the JPEGs that your cam produces, that’s fine! ;-)


Cheers

Rusty
Australian Digital Photo Of The Day: http://www.potd.com.au


Photography help for beginners - Film & Digital Camera Techniques - Post Processing - Photography tips and tricks - RAW v's JPEG


Tuesday, 15 May 2007

What to photograph? #2: Festivals & Fairs

If your strolling around looking for things to photograph, why not check your paper or local "What's On" web site for festivals and fairs. Normally you will find that every weekend, something, somewhere is happening and that they may provide heaps of photo opportunities.

My personal faves are the medieval fairs and balloon festivals, as both of these provide spectacular photo ops that are full of colour and excitement. It is not uncommon for me to drive 10-12 hours to get to one of these either... the photo ops really are that good!


Now not everyone wants to drive that far (OK, i'm a loon!) but there will be something close to you I am sure.

How about popping down the local markets this weekend? Most of us have a market nearby (I wouldn't drive 11 hours for a market btw) and markets are great for getting in close for colour, shapes and texture. Finding the picture within the overall scene is a great challenge and can be very rewarding at times.


Remember, the trick to improving one's
photography is to not only shoot lots, but to also shoot many varied locations and events.... you need to put your self outside your comfort zone and into situations that are foreign to you, as this will make you think outside your square as you rise to the challenges presented.

Cheers

Rusty
Australian Digital Photo Of The Day: http://www.potd.com.au


Photography help for beginners - Film & Digital Camera Techniques - Post Processing - Photography tips and tricks - Festivals and Fairs


Monday, 14 May 2007

Tip 4: Neutral Density Filters

In one of my earlier tips, I mentioned the use of neutral density filters to extend shutter speeds and allow for capturing movement.

Quite simply, a neutral density filter is.... "Neutral" in it's effect on colour (at least the good ones are) and effects the "density" or amount of light entering your camera.


Neutral density filters are available in a range of "stops" (eg how much their density effects the light... each "stop" halves the amount of light entering) and are uniform in their effect across an image. Naturally, these are particularly useful when the lighting is too bright for your desired shutter speed and aperture combination, but
control the light and you can control other elements of your images also....

An example of where this would be useful is a flower with a relatively close background. You may wish to isolate the flower from the background using a shallow
"Depth Of Field" technique (...or "DOF" - the area of the image that is in focus)... this would require a wide open aperture (small f-number on lens) to minimise the DOF, but this may also let in too much light. You can compensate for this by using a faster shutter speed, but should this still not be enough, a neutral density filter (or filters) can be used to decrease the light, so that a correct exposure can be achieved at the wider open aperture.

These examples display the shallow DOF technique. You will notice that the first image has greater DOF and the background is a bit distracting because of it's sharper focus. To make the DOF shallower and isolated the flower more, a wider aperture has been used in the second image.


Now the experienced reading this will look at the image and say "the light shown
here could easily be controlled with a faster shutter speed" and they would be absolutely correct, but the results in the above "examples" are exactly what would be achieved with the use of neutral density filters in excess light situations.

The last example is probably the most common use of the neutral density filter. It displays how a longer shutter speed has been used to highlight water movement. In this case a lot of DOF was achieved by using a small aperture (larger f-number on lens) and this smaller aperture also reduced the amount of light entering the camera and thus extended the shutter time, allowing the water to blur.

To further enhance this movement and produce a smooth flow, the use of a neutral density filter has lessened the light and extended the shutter speed required for correct exposure.

Shot's like this are easy in the low light conditions of early morning or late afternoon, but try this in bright midday sun and it becomes almost impossible, as the shutter speeds required for correct exposure (even at the smaller apertures) are too fast to allow water "flow" like this to be captured.... this is where the neutral density filter becomes an invaluable tool for the photographer.

Naturally where long shutter speeds are utilised (longer than 1/60 sec) the use of a tripod is recommended.

Cheers

Rusty
Australian Digital Photo Of The Day:
http://www.potd.com.au


Although I now use the Lee Filter System, I had great success with the Hoya HMC ND400...


Tags: neutral density filter long exposure nd nd400 nd-400 lee filters photographic photography big stopper


Friday, 11 May 2007

What to Photograph? #1: The City


The city (any city) offers some great photo locations and I find that there is an image around every corner. From a photographic viewpoint, cities are graphic element on graphic element.

Your job as a photographer, is to recognise these elements and how they interact with each other to make a visually appealing composition.
Day time, night time or in between when the light is soft... the city changes moods with each period, going from a harsh jungle of concrete and glass in the day, to a fairyland of twinkling lights at night.

The image on the left, is an example of where a graphical element has been used to lead the viewer through the image to the main point if interest, being the lights and movement of people.

Selecting the right time of day for this kind of image is vital. This shot would be nothing if shot during full daylight, as there would be very little colour, no reflected glow and more than likely harsh shadows.

Similarly, if this was shot in full darkness it would not be as good... sure we would maintain the colour and reflected glow, but the sky glow would be lost as would our definition in the graphic element.

In this example, I have again used the last remaining ambient light and mixed it with the colour of the city.

With the fading light longer shutter speeds are required (time for the tripod) and this will or course lead to blur in moving subjects. This is not all together a bad thing, as it can, at times, be used to the photographer's advantage.

Here you see movement in some people, while others stay still and this gives the image life.

Oh... and be ready for anything! The city is a rich blend of races, cultures, personalities, situations and levels of sanity.

I forget what I was shooting at the time here, but I remember dropping that and hastily setting up for this when I saw this women coming down the street.

I found it "quirky" that she be caring the instrument case and I knew that my location would provide an interesting silhouette.

When starting out in the city, most people will plan on doing a traditional "cityscape" eg a wider view showing the city skyline reflected in a river perhaps. These are great pix to have in your library, as they are used regularly in advertising etc. The best tip I can give you here is "don't wait until dark", as the skyline itself will be lost into the darkness.

Plan to start shooting a skyline about 30 mins after sunset, this way, the remaining ambient light will maintain some detail in the buildings, will keep colour in the sky and will also allow for the city lights to be effective.


While this image is not the classic "skyline" as mentioned, it does display a good mix of ambient light, city light and after sunset sky glow.


This image has good graphic content, but sadly I arrived too last at this location and I failed to capture any sky glow, so I don't feel that this image is a strong as it could be.


Get in close and don't be afraid of picking out smaller sections of your subject.


SAFETY
- Please be aware of your surroundings and try to stay in a place where there are a number of people, as even the safest of cities has it's undesirables and it's best they be avoided. If you are able to take a friend, please do... "safety in numbers" and all that. ;-)

Cheers

Rusty
Australian Digital Photo Of The Day: http://www.potd.com.au


Photography help for beginners - Film & Digital Camera Techniques - Post Processing - Photography tips and tricks.


Thursday, 10 May 2007

Rusty's Ramble #1: Dust and the DSLR Camera

There is a lot of hype made of the dust problem in DSLR cameras (you know, the ones with interchangeable lenses), enough so, that many photographers are missing out on the DSLR camera experience all together, because they fear the dreaded "dust bunny" so much :-( (BTW: Why is it a dust bunny? Who made that up? Is it because dust is often seen as little fluffy things? ...hmm??)

I just want to say that dust IS an "issue" with DSLR, but thankfully it is easily managed. For many years (even prior to digital... do you remember those years?) photographers have been dealing with dust. Dust on the film, dust getting stuck in the film canister entry and scratching the film on rewind, dust on the processed film, dust on the enlarger lens, dust, dust and more dust!!!

So for years we have been cleaning things and spotting prints with tiny brushes. Admittedly, film was good because what ever dust that was on it, went with the film and didn't hang around in the cam, but it was still a concern.

These days Photoshop makes it easy to remove any dust issues in your image (a "How to" on removing dust from images will follow soon) and digital printing virtually removes all dust issues on the printing side, with our prints no longer being projected through lenses to expose the paper, but rather LEDies and lasers are doing their thing.

So dust on the sensor is where the main issue now resides. There are a couple of things we can do to help minimise dust, like... avoid changing lenses in dusty environments if possible (...der!!), or change lenses with the camera body facing down, but basically a time will come when you will need to clean the sensor.

This is not as daunting as it may sound. Firstly, we never actually clean the sensor, as it resides behind anti-alias filters, IR filters and in most cases micro-lens arrays, but even so, damage one of these and it will require a trip to the doctor to be fixed, so be careful... but not scared.

There are a number of cleaning techniques and equipment on sale for this task (personally, I use a blower and static brush to clean mine) and I would suggest that you do some research to see what you think right for you.

Once you have cleaned your sensor a few times, you will become quite comfortable with the task (you may not even sweat like you did the first couple of goes) and it will become a normal part of your camera management routine.

The big thing to remember is NOT to be paranoid about dust. Often most sensor dust will never be seen on an image, often you will need to be shooting f16 or 22 for it to become visible, so if you are not seeing it in your every day images, don't bother cleaning. Only when it effects your images is it time to clean.

Cheers

Rusty

Australian Digital Photo Of The Day

UPDATE: The current marketplace has expanded and there is now a large variety of cleaning tools available, however this is what I still use and find the best...


Tags: camera dslr sensor cleaning dust removal brush swabs pec pads blower photo photography photographic


Wednesday, 9 May 2007

Tip 3: Star Trails


Ever wanted to photograph star trails? ....well it may be a whole lot easier than you think!

This image posed a little difficulty in the fact that it is not simply a star trail on it's own. It contains foreground elements that needed to be considered on their own in terms of exposure.

The shed was shot first with a 30 second exposure, using two consecutive flashes (different angles) and red foreground glow provided by a red LED head lamp.

A second image was shot for the stars, using a known exposure rating of 25 mins f5.0 ISO100.

The two images where then combined in Photoshop. This two frame technique allowed me to experiment with the shed lighting and get instant feedback (yes I was shooting digital).

The star trail exposure was a given (I had previously ran some tests and determined that 100ISO f4.5-5.0 would expose the stars correctly) and to shoot the foreground lighting within the start trail exposure, ran the risk of wasting a 25min exposure if I stuffed up the shed part.


With limited battery power on hand and the weather changing rapidly (fog rolled in at the tail of this exposure) the two shot method was considered the safest option.

It should be noted that you can leave the shutter open for any length of time to get the length of trail required, BUT you need to consider the noise generated with long exposures and also the camera battery life. In my case I found that 25-30 minute exposures are still very clean with my camera and this time also provided enough star movement for me.... while also allowing safe battery for the exposure and the following 25-30 minute noise reduction exposure that follows.

If you're shooting film, it's no different except that you will be able to comfortably shoot longer exposures, as film "grain" remains a constant unlike digital "noise" that increases with the exposure length.

The stars are moving in a circle because "Celestial South" was an important inclusion in this composition. To find celestial south in the night sky, first find the Southern Cross and then extend the long arm about 4.5 times.... that's it... simple huh! ;-)

What's that... you're in the northern hemisphere and want to know how to find Celestial North? Well you guys are lucky and have a northern star marking the point, but sorry, I can't see it from here. :-( I am sure that a quick Google (or a chat to 3 wise men) will find the answer that you are looking for though. ;-)

Cheers

Rusty
Australian Digital Photo Of The Day: http://www.potd.com.au


Photography help for beginners - Film & Digital Camera Techniques - Post Processing - Photography tips and tricks - Star Trails


Tip 2: Conveying Movement

I mentioned in Tip 1 about how we can "drag" the shutter to capture the movement of waves and make a mist like effect. Well now lets look at another use of the slow shutter speed to capture movement in a different way.

Fast moving objects can make a very boring photograph if their sense of movement is not portrayed. When photographed, what's the difference between a parked car and a speeding car if all motion has been frozen? Anyone? Yes you down the back.... Correct, absolutely bugger all! No difference what so ever, as both cars will simply look "parked".

So how do we maintain the sense of movement when we are capturing a single image? By dragging the shutter and allowing motion "blur" to become an effective part of our image.


You have two main choices here, keep the camera still (tripod mounted) and allow the subject to blur while the background stays sharp.... or to "pan" the camera (move the camera with the subject, trying to keep it in exactly the same position within your frame) and keep the subject sharp while allowing the background to blur.


Both techniques have their uses, but I would say that "generally" the blurred background is the popular choice, as detail in the subject itself is important more often than not.


This image was very much just an expression of colour, tone and graphic elements. The car detail itself is not important, so here I have used a slow shutter speed while the camera was tripod mounted.


Another example of static camera + moving subject. Waterfalls & flowing water are a couple of the most popular uses for this technique.


With this rodeo image I have used the slow shutter speed (1/40th sec) & the pan technique, as I wanted to maintain detail in the subject, while also displaying the action and excitement of the rodeo event.


This kind of subject lens itself well to this technique, as different parts of the subject are in different directions of motion and this adds to the blur in a exciting way.


Panning is something that takes practice and even the best sports shooters (which I am not) get plenty of images that are ...looking for the right word here....ummm.... CRAP! So don't get frustrated with your early results, keep up the practice and shoot heaps.
(You have heard the pro's cranking off 8 frames per second haven't you? They do that for a reason you know. lol)

Does that mean that freezing the action is a no-no? No of course not! It's still fine to freeze the action, but you need to think about the image and what would best suit.


Freezing action with fast shutter speed. Typically shutter speeds of 1/1000 sec or shorter are required to freeze fast moving action.


Cheers

Rusty
Australian Digital Photo Of The Day: http://www.potd.com.au


Photography help for beginners - Film & Digital Camera Techniques - Post Processing - Photography tips and tricks.


Tip 1: Misty water

NOTE: I am in the process of moving this blog to our new web site. Because this blog will be removed in the near future, please share or link to the new location. Thanks 

http://www.australianlight.com.au/blog/post/creating_misty_water


Many people have asked me how to create the "mist like" sea effect seen here....


 Well this is really quite simple and requires only one piece of specialised equipment... a tripod!

The technique is called "dragging the shutter", that is making the camera shoot a loooong exposure time on purpose. (In this case it was 6 seconds)

This long exposure means that the ocean waves had time to move up over the rocks and move back out again. So the camera has seen the white water on top and also the rocks underneath. The resulting image is then a bit of both and it looks like mist.

Why the tripod? I am glad you asked.... naturally we need to hold the camera very still during the exposure, or else everything in the shot would be blurred.... we are happy to allow the waves to move, as this is creating the effect we are after, but if the rocks moved it wouldn't look so good would it. lol

But how do we make the camera take such a long exposure? Firstly you need to drive the camera manually. Leaving your cam on full automagic is not going to do the trick, as it naturally wants to shoot as short an exposure as possible to avoid blur due to camera movement.

So get off auto and give either Manual (you set shutter speed and aperture and watch your light meter for correct exposure), Shutter Speed Priority (you set the shutter speed - in this case long - and the camera sets the aperture that suits), or Aperture Priority (you set the aperture and the camera sets the shutter speed - in this case you will need to select an aperture that lets in little light - eg a BIG f-number - and this will force the camera to compensate with a long shutter speed)

In all of these cases there will be limitations on just how long a shutter speed you can make your camera do, as this will be governed not only by the characteristics of your camera, but also how much available light there is at your location. So a shot like this is harder to do at midday, than it is to do just before sunrise or sunset. This does not mean that it can't be done at midday, but some extra equipment eg Neutral Density Filters may be required, but we will talk about them later.

Cheers

Rusty
Australian Digital Photo Of The Day: http://www.potd.com.au


Photography help for beginners - Film & Digital Camera Techniques - Post Processing - Photography tips and tricks - Long Exposures


Introduction: Why a photography blog?

Why a blog? ...to be honest I don't know. Someone told me that I need one and that it could be used as way to pass on info about my photography techniques and images.

Well I am not sure if that's the case, but I guess we will see what develops (yes that pun was intended lol)

So I guess I should introduce myself.... my name is Russell Stewart, I live in Australia and I have been taking photographs commercially since 1980. I have qualifications in photography and absolutely nothing else, so I would be totally buggered if I ever needed a real job again and could not shoot. :-)

Since about '98 I have done only limited commercial work (by choice) and have mainly shot for my own enjoyment. I shoot anything.... if it stands still I shoot it! ....if it moves I use a motor drive! (Oh no... more sick photography jokes! ...this is your chance to leave, I won't be offended, as I know my jokes are bad)

My images can be found at http://www.pixelpix.com.au/gallery If you feel that you would like to check them out, please drop by. I would be more than happy to answer any questions about my work and if there is anything that I "may" know that will help your photography, then it's here for the asking.

If you are an Aussie, please drop by my competition web site http://www.potd.com.au ...here you can enter competitions, upload photos, discuss photography and even get together with other photographers for a days shooting. It a great community of friendly, helpful people, but I must stress that it is for Australian Residents ONLY!

Cheers

Rusty
Australian Digital Photo Of The Day: http://www.potd.com.au


Photography help for beginners - Film & Digital Camera Techniques - Post Processing - Photography tips and tricks.